Thursday, 10 June 2010

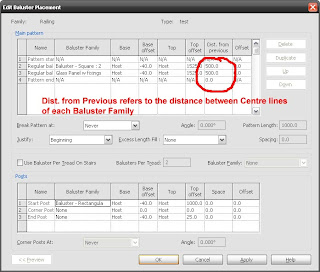
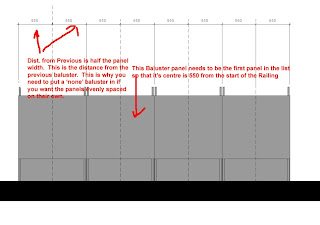
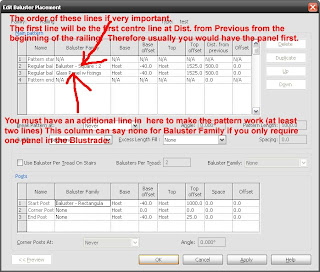
Baluster Explanation of Dist. from Previous Revit


These diagrams should make it all clear.

Tuesday, 8 June 2010

Revit - Editing Grid Head Size to work nicely at all scales

The Text within the Grid Head is contained in the Grid - Circle family (a system family) You can add a family to this family to change the circle size

Monday, 7 June 2010

Railings in Revit


Drawing a Panel from scratch using the panel template. If one creates an extrusion in the left or right hand view clicking to the four corners of the reference planes like this creates a panel 600mm wide.

Now at last here is the top tip for using the ballusters. Make sure you have half the panel width in the Dist. from previous if you do not want a gap between each panel or balluster. This is because the setout position is the centre of the panel. Therefore the Distance from Previous is actually the distance of the start of the next panel from the centre (setout line) of the previous panel.

Here are some useful descriptions of the railing settings:
At the bottom under the setction titled POSTS the Start Post has a setting called SPACE. This setting is the amount that the start post (or panel is offset to the right of the start of the ballustrade. The amount in from the end of the ballustrade.

Friday, 4 June 2010

Revit Stairs Interesting fact about risers

If you create a stair that starts at Level 0 and rises to Level 1 using the boundary and riser method of skeching (or probable any method, then change the height of the first floor, the stair risers will only change if the stair type has a maximum riser height set to an amount that can accomodate the change. In other words make sure you have the maximum riser height set already to an amount that works for the building.

If you want to change the maximum riser height later, you will need to duplicate the stair type. If you try to change the maximum riser height of the existing stair, nothing will happen. Beware.

Wednesday, 2 June 2010

Adding the 3GB switch to the startup .ini to give Revit the chance of more RAM

In lay terms, Windows usually allocates 2 gigs of RAM to programs and 2 gigs to the system. With the switch it changes it to 3GB for programs and 1GB for other things.

This is how you do it.

a) Access the boot.ini file by opening the System Properties dialog on "My Computer". Under the Advanced tab and Startup and Recovery press Settings. In the startup and recovery dialog press the edit button. This should open a text file with something close to the following content:

[boot loader]

timeout=30

default=multi(0)disk(0)rdisk(0)partition(1)\WINDOWS

[operating systems]

multi(0)disk(0)rdisk(0)partition(1)\WINDOWS="Microsoft Windows XP Home Edition" /fastdetect /noexecute=optin

b) Were are going to modify it and make a failsafe so that if the mod doesn't work we can go back to the original setting:

Copy the last line and add /3GB to the end of it (make sure you spell it right). Between the parentheses type 3GB at the end so you'll be able to recognize it when XP restarts. Also if you don't have noexecute=optin add that too. The whole thing will look like this

[boot loader]

timeout=30

default=multi(0)disk(0)rdisk(0)partition(1)\WINDOWS

[operating systems]

multi(0)disk(0)rdisk(0)partition(1)\WINDOWS="Microsoft Windows XP Home Edition" /fastdetect /noexecute=optin multi(0)disk(0)rdisk(0)partition(1)\WINDOWS="Microsoft Windows XP Home Edition 3GB" /fastdetect /noexecute=optin /3GB

c) Save the file and restart the machine. Now you will have 2 choices when booting. Pick the '3GB'. If it crashes or you experience any other problems go back to the first option. Later try adding the userva=2500 switch to the last line of boot.ini and save. Personally I didn't have to use it. This is how the last line would look:

multi(0)disk(0)rdisk(0)partition(1)\WINDOWS="Microsoft Windows XP Home Edition 3GB" /fastdetect /noexecute=optin /3GB /userva=2500

Also check System Properties and make sure that under the General tab it say Physical Address Extension at the bottom